You’re walking east along Sands Avenue, maybe heading back from the Venetian after a long evening on the Strip, when it stops you cold. The Las Vegas Sphere rises above the roofline without warning — a glowing, impossible orb the size of a skyscraper tipped on its side, its surface rippling with color and motion so vivid it looks like something dreamed up for a science fiction film. Your hand is already reaching for your phone before your brain catches up. That reflex is completely correct. The Sphere is one of the most photogenic structures ever built, and in 2026 it remains the single most talked-about new landmark on the entire Strip. But knowing how to photograph the Las Vegas Sphere well — rather than just snapping a blurry blob of light — takes a little preparation. This guide covers exactly where to stand, when to show up, and which settings to dial in, whether you’re shooting on an iPhone or a Canon Rebel.
What Makes the Las Vegas Sphere So Photogenic
The numbers alone are staggering. The Sphere stands approximately 366 feet tall and stretches 516 feet wide, making it the world’s largest spherical structure. Its exterior — officially called the Exosphere — is covered in roughly 1.2 million programmable LED pucks capable of displaying virtually any image, video, or animation at extraordinary resolution. What that means for photographers is that no two visits produce the same shot. On any given night the Sphere might be cycling through cosmic imagery, sports graphics, seasonal art, or brand partnerships, each display creating an entirely different visual mood. During daylight hours, the structure itself rewards architectural photography: the sheer geometry of the dome against the desert sky is striking even when the LEDs are off. Come back after dark, and that same frame transforms into something closer to a special effect.
Best Spots to Photograph the Las Vegas Sphere
1. Pedestrian Bridge on Sands Avenue
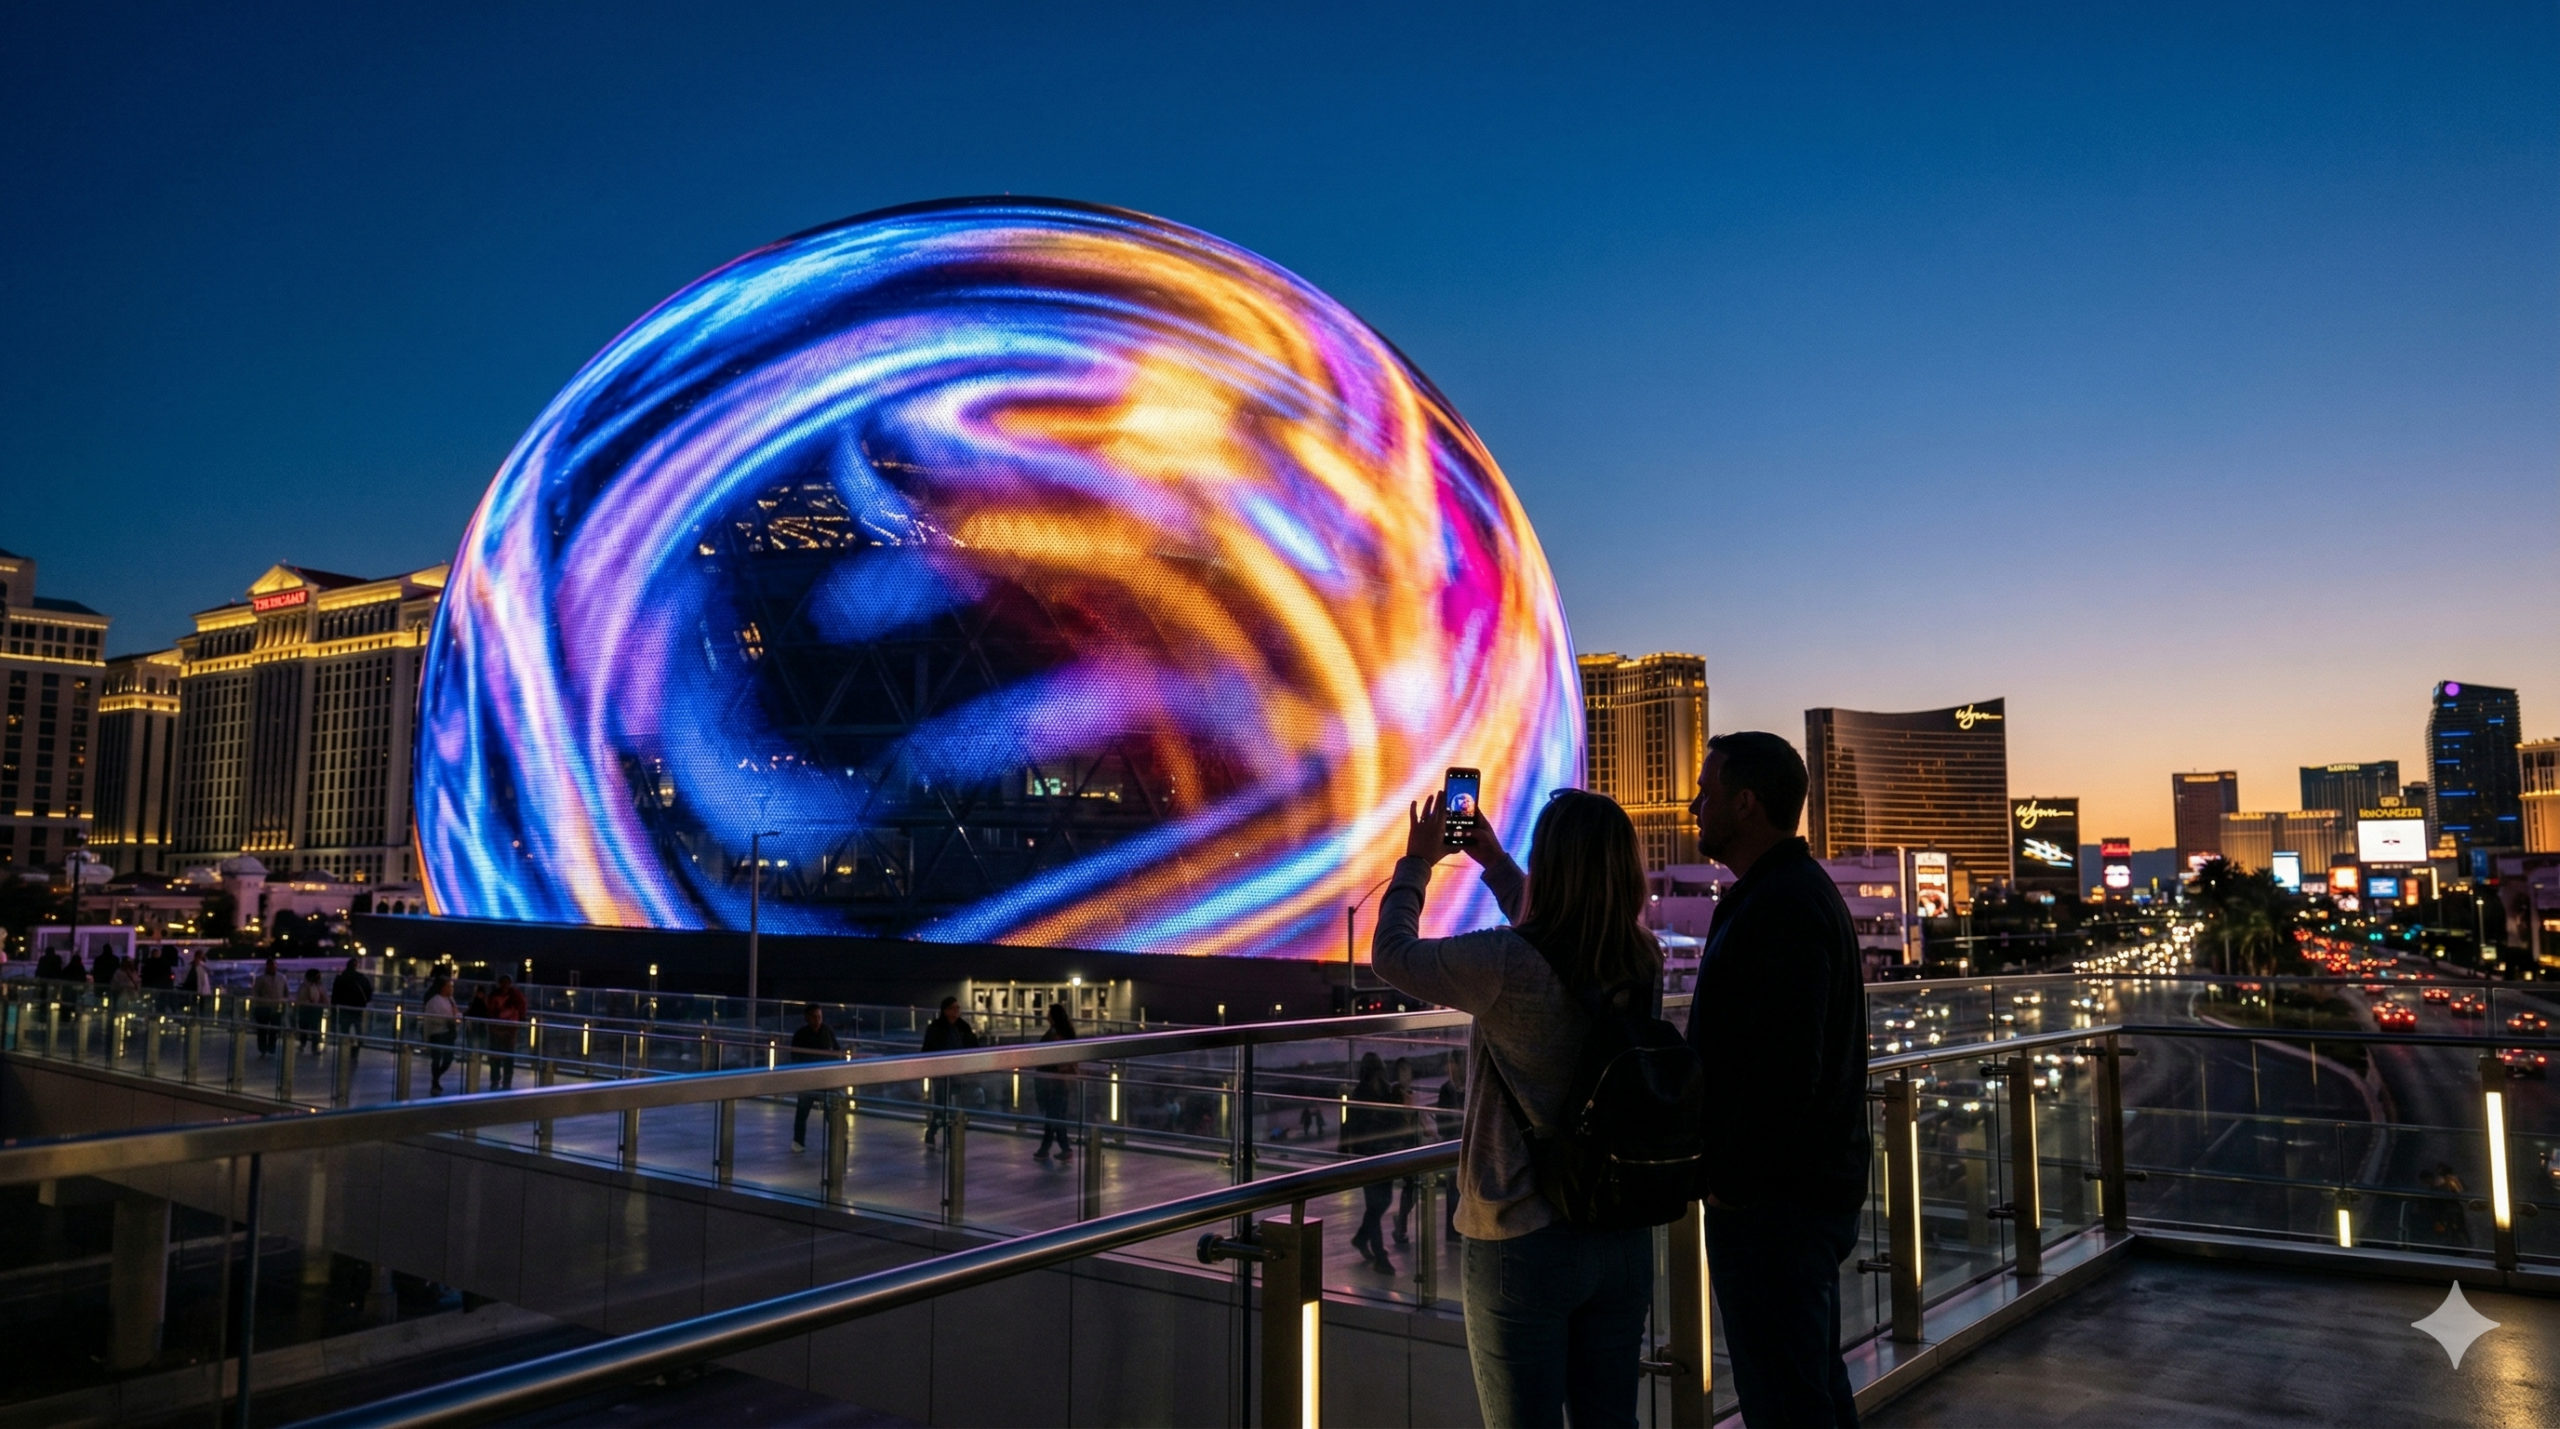
The pedestrian overpass that spans Sands Avenue near the Venetian Expo Center is the secret handshake among serious Sphere photographers. Walking up the ramp puts you roughly 15 feet above street level, and from that elevated position you can line up a shot where the Sphere fills the frame with almost nothing competing on either side. Look southeast from the bridge deck and you will see the full spherical silhouette — top to bottom, edge to edge — without the clutter of street signs, parked cars, or pedestrian traffic breaking the composition. Because you are slightly above the surrounding streetscape, the Sphere appears to float. This spot works brilliantly at blue hour, when the fading sky wraps around the structure in deep indigo. There are no gates or access restrictions; the bridge is a public pedestrian walkway open at all hours.
2. Corner of Koval Lane and Sands Avenue
Walk about two blocks east from the Sphere along Sands Avenue, turn the corner at Koval Lane, and look back west-northwest. From this ground-level intersection you get something the pedestrian bridge cannot offer: foreground depth. The palm trees lining Sands Avenue create natural framing on either side of the frame, and if traffic is moving along Koval, the light trails from passing vehicles add a kinetic energy that makes long-exposure shots come alive. This is also one of the few spots where you can comfortably set up a compact tripod on the sidewalk without blocking foot traffic. At night, with the LED display running at full brightness, the Sphere is bright enough to read by from this distance — your camera will have no trouble locking focus even in the dark.
3. Strip Sidewalk Near the Venetian and Palazzo
Standing on Las Vegas Boulevard in front of the Venetian or Palazzo and facing northeast gives you the classic establishing shot: the Sphere rising dramatically above and behind one of the Strip’s most elaborately decorated facades. The scale contrast here is remarkable — the Renaissance-inspired architecture of the Venetian in the foreground, a giant glowing orb in the sky behind it, and the constant motion of Strip crowds and taxis between you and it. Frame wide to get both subjects in the same shot, or zoom in to isolate the moment where the Sphere’s curve meets the casino roofline. If you are shooting at street level, look for gaps in the crowd to use the Venetian’s ornate street-facing columns as a natural frame within the frame. Evening is the prime window here, both because the LED display is active and because the Venetian’s exterior lighting adds warmth to the foreground.
4. High Roller Observation Wheel
The High Roller at the LINQ Promenade stands 550 feet tall, which means a full rotation puts you well above the Sphere’s own roofline at peak height. As your gondola climbs through the eastern arc of the wheel, the Sphere appears at roughly eye level and then slightly below — a perspective that is simply unavailable anywhere else in Las Vegas. Because the gondola moves slowly and continuously, you get a wide sweep of viewing angles during a single 30-minute ride. This is the one vantage point where you can photograph the Sphere with the full Strip spreading out beneath it in both directions. Buy your ticket in advance online to choose your preferred boarding time and arrive 10 minutes early to position yourself in the gondola for the east-facing approach. Admission runs around $25–$37 depending on time of day, with happy-hour pricing available during the late afternoon window.
5. Eastward-Facing Strip Hotel Room Window
If you are staying in a high-floor room on the east-facing side of a Strip hotel between the Wynn and Caesars Palace, your window may be the best tripod platform in Las Vegas. Hotels including the Palazzo, Venetian Tower, and Wynn all have rooms with unobstructed views toward the Sphere from above street level. Check your room assignment at check-in and do not hesitate to ask the front desk specifically for an east-facing high-floor room — staff at these properties hear the request regularly. Shooting through clean glass (not a scratched or reflective window) at night with your lens pressed gently against the pane minimizes reflections. From 20 or 30 floors up, the Sphere sits comfortably in the middle of a frame filled with the glittering grid of Las Vegas east of the Strip, making for a dramatic wide cityscape shot.
Best Time of Day to Shoot the Sphere
Blue hour is your best window, and it is not particularly close. The Exosphere LED display activates at or just after sunset — typically between 8:00 and 9:00 p.m. in summer and closer to 6:00 to 7:00 p.m. in winter — and for roughly 20 to 40 minutes after that the sky still holds a deep, saturated indigo that gives your images a second light source to work with. The result is a balanced exposure where the LED display pops without blowing out and the sky retains beautiful gradients of blue and violet. This is genuinely the sweet spot.
Golden hour — the 30 to 45 minutes before sunset — rewards architectural photography. The warm directional light rakes across the dome’s surface, revealing the texture of the LED panels and casting subtle shadows that add dimension. The Exosphere is not yet active at this point, so you are working with form and structure rather than color and animation.
Full dark, once the sky goes completely black, gives you maximum LED drama. The Sphere is at its most visually arresting — colors are punchy and the contrast between the lit surface and the night sky is extreme. The tradeoff is that exposure becomes trickier; your camera has nothing to balance the brightness of the display against, and highlights can clip easily.
Midday is the least glamorous option but not without merit. Hard overhead sun is unflattering for most subjects, but the geometry of the Sphere holds up well in flat light, and the surrounding architecture reads clearly without harsh shadows. It is a workable choice if your schedule allows no other window.
Camera Settings for the Las Vegas Sphere
Smartphone Settings
At dusk and into the evening, switch Night Mode on and let it run for your first few shots to get a baseline exposure. Then open your camera app’s Pro or Manual mode — available natively on modern iPhones as well as Samsung Galaxy and Pixel devices — and experiment with an ISO between 800 and 1600, a shutter speed between 1/15s and 1/30s, and manual focus locked onto the surface of the Sphere itself rather than the sky behind it. Tap the Sphere on your screen to set the exposure reference point; if you tap the sky, the display will be severely overexposed. For daytime shots, enable HDR and keep ISO at its base value (usually 50 on iPhones) for the cleanest possible image. A small travel tripod — the Joby GorillaPod 3K is a compact and reliable choice — or a DJI OM 6 phone gimbal will eliminate the motion blur that kills Night Mode shots taken handheld.
Entry-Level DSLR and Mirrorless Settings
During daylight, Aperture Priority mode at f/8 with ISO 100 to 400 gives you the depth of field to keep both the Sphere and any foreground elements sharp, while letting the camera handle shutter speed automatically. In most midday and golden-hour conditions you will end up somewhere between 1/250s and 1/1000s — fast enough to handhold without blur.
At blue hour and into full dark, switch to Manual mode. Start with f/5.6 to f/8 (enough depth of field to keep the whole structure sharp), ISO 800 to 3200 depending on how bright the LED display is running, and a shutter speed between 1/30s and 2 seconds. A tripod is not optional here — it is essential. Use your camera’s built-in 2-second self-timer or a wireless remote shutter release to eliminate the vibration introduced by pressing the shutter button. If your Sony a6000, a6400, or Canon Rebel SL3 has in-body stabilization or a stabilized kit lens, keep it enabled when shooting handheld but turn it off once you are on the tripod. Shoot RAW whenever possible; the Sphere’s LED colors can clip or shift in JPEG compression, and RAW files give you significantly more control over recovering highlight detail and correcting any color cast in post-processing.
Best Angles and Compositions
Start with the wide establishing shot: the Sphere in full context within the Las Vegas skyline, enough surrounding environment that the scale registers immediately. From any of the spots described above, step back until the Sphere occupies roughly one-third of the vertical frame height — that proportion tends to feel both grand and informative.
Then move in close. The surface texture of the Exosphere at full LED output is extraordinary when isolated: individual panels, color gradients shifting across the curve of the dome, the slight imperfections where geometry meets light. A 70mm or longer focal length from the Sands Avenue bridge or the Koval Lane corner lets you pull a detail shot that looks almost abstract.
Look for reflections in the Venetian and Palazzo’s glass facade panels along Las Vegas Boulevard. On evenings when the Sphere is running a particularly colorful display, those warm tones bounce into the casino glass and create a secondary image that is ghostly and luminous at the same time. Frame tightly on a window panel to get the reflection filling the shot.
Put a person in the foreground. The Sphere’s scale is genuinely difficult to communicate without a human element — a friend standing on the Sands Avenue sidewalk with the glowing dome behind them gives viewers an immediate reference point and a more personal, travel-magazine feel. Finally, use the Strip’s streetlights and median plantings as leading lines: position yourself so that a row of lamps or palm trees converges toward the Sphere in the background, drawing the eye directly where you want it.
Gear Worth Packing for a Sphere Photo Session
You do not need to overpack for this. A compact travel tripod like the Peak Design Travel Tripod or a Joby GorillaPod 3K takes up almost no room in a carry-on and makes a genuine difference for every shot taken after sunset. If you are shooting on a smartphone, a clip-on wide-angle lens — the Moment 18mm Wide is well-regarded — lets you capture the full structure from closer vantage points without backing into traffic. A DJI OM 6 phone gimbal stabilizer is worth considering if you plan to shoot any video alongside your stills; it also helps significantly with long-exposure stills when a full tripod is inconvenient.
For interchangeable-lens shooters, the Sony a6000 or a6400 paired with the 16–50mm f/3.5–5.6 kit lens is a genuinely capable lightweight kit for this subject. The 16mm end is wide enough for establishing shots, and the 50mm end brings in enough reach for decent detail work. Canon shooters with a Rebel SL3 and the 18–55mm f/4–5.6 STM kit lens are in a similar position. If you own a longer prime — a 50mm full-frame equivalent or longer — toss it in the bag for the LED texture shots. A spare battery is worth adding; cold desert nights and extended shooting sessions can drain a charge faster than expected.
Frequently Asked Questions About Photographing the Las Vegas Sphere
Can you photograph the Sphere for free?
Yes, completely. Every public outdoor vantage point described in this guide — the Sands Avenue pedestrian bridge, the Koval Lane corner, and the Strip sidewalks — is freely accessible at all hours. You do not need a ticket to the Sphere, a hotel room, or any paid admission to photograph the exterior. The only shooting spots that carry a cost are the High Roller observation wheel (roughly $25–$37) and a hotel room with a view.
What time does the Sphere light up?
The Exosphere typically activates at or just after local sunset, which ranges from around 5:30 p.m. in December to approximately 8:00 p.m. in June. The display generally runs until well past midnight. Exact activation times can vary slightly depending on programming schedules and events happening inside the venue, so plan to arrive 20 to 30 minutes before your local sunset to catch the full transition from off to on.
Are tripods allowed near the Sphere?
Compact travel tripods and GorillaPod-style flexible tripods are generally usable on public sidewalks and the pedestrian bridge without any issues. Full-size studio tripods with wide spreader legs can create pedestrian obstruction and may attract attention from security personnel in high-traffic areas. Keep your setup small and be prepared to step aside if foot traffic requires it. Inside MSG Sphere as a venue, tripod policies follow standard concert-venue rules and will depend on the specific event.
Can you photograph inside the Sphere?
Personal photography is permitted inside MSG Sphere for most events, subject to the policies of each individual show or event. Dedicated cameras (DSLRs and mirrorless) may be restricted for certain performances — check the specific event’s entry policy before you go. Smartphones are generally allowed. The interior experience includes the world’s largest LED screen, roughly 160,000 square feet of display surface curving overhead, which is itself a remarkable photographic subject.
What is the best lens for photographing the Sphere?
A wide-angle to standard zoom covering roughly 16–50mm on an APS-C sensor (equivalent to 24–75mm full-frame) handles most Sphere photography effectively, getting you from wide establishing shots down to mid-range compositions. For detail and texture work on the LED surface, a 70–200mm zoom or even a 50mm prime used from a distance gives you enough reach to isolate individual sections of the dome. A fast prime in the f/1.8 to f/2.8 range is worth considering if low-light handholding is a priority for your shooting style.
Go Beyond the Main Strip
The Sphere is an extraordinary starting point, but Las Vegas rewards photographers who wander beyond the obvious frame. Once you have got your Sphere shots locked in, give yourself permission to explore. You will find compositions you never expected just a few blocks off the main boulevard. For more inspiration on where to point your camera across the city, take a look at the best Las Vegas photoshoot locations guide on this site, and if you are ready to go deeper, the secret photography spots in Las Vegas guide will take you somewhere the tour buses never stop. Happy shooting.