Most people spend more energy worrying about a photoshoot than actually preparing for one. That’s understandable — cameras can feel intimidating, and there’s no shortage of conflicting advice about what to wear, whether you need a glam team, and how to not look stiff in every frame. After photographing hundreds of clients in Las Vegas, here’s what I know for certain: the difference between photos you love and photos you tolerate comes down almost entirely to preparation, not perfection. Below is my complete guide on how to prepare for a photoshoot — from the decisions you make two weeks ahead to the morning-of details most people skip.
Get Clear on the Purpose Before You Prep Anything
Before you buy a new outfit or schedule a makeup trial, figure out what this session is actually for. It sounds obvious, but it shapes every other decision you’ll make — from styling to posing to the overall feel of the images.
Ask yourself: What is this for? (Headshots, family portraits, branding content, graduation, boudoir, lifestyle?) Where will the images actually appear? (LinkedIn, a company website, printed holiday cards, Instagram, press materials?) What feeling do you want to carry out of this session?
- Headshots for business use: clean, professional styling, solid colors, nothing that competes with your face
- Brand or content sessions: 2–3 distinct looks — polished, casual, and one that’s purely “you”
- Family portraits: coordinated outfits in a consistent color range, not identical matching sets
- Boudoir: wardrobe, glam prep, and posing for intimate sessions have their own rhythm — our boudoir photoshoot prep guide covers all of it in detail
Once the purpose is locked in, save 10–15 inspiration images on your phone. Not to copy them — just to show your photographer the vibe you’re going for. That two-minute conversation at the start of a session saves a lot of guesswork.
How to Choose a Photographer Who Fits Your Vision
Two photographers can be equally skilled and still produce completely different results for you. Style match matters more than follower count or a long list of awards — here’s what actually makes a photographer worth booking in a market as crowded as Las Vegas.
When researching photographers, go deeper than social media. Ask to see full galleries from a few recent sessions — not just highlight reels. Instagram shows best-ever moments; full galleries show how a photographer actually performs in real light, with real people, across an entire edited set. Look at how they handle mixed lighting, different body types, and the less-dramatic in-between moments.
During any consultation, ask three things:
- How do you help clients feel relaxed and natural on camera?
- Do you direct poses, or is the session more candid and free-flowing?
- What do you need from me ahead of time to get the best results?
A photographer who gives specific, confident answers to those questions has usually shot enough sessions to know what actually works. And if you feel comfortable after five minutes of conversation — that ease shows up in your photos. You genuinely cannot fake relaxed. If you’re still figuring out what a Las Vegas portrait session should cost before you commit, our breakdown of Las Vegas photographer prices covers session types, package structures, and what’s reasonable at each tier.
What to Wear for a Photoshoot (Without Overthinking It)
Outfit prep is where most people spiral. Here’s how to simplify it.
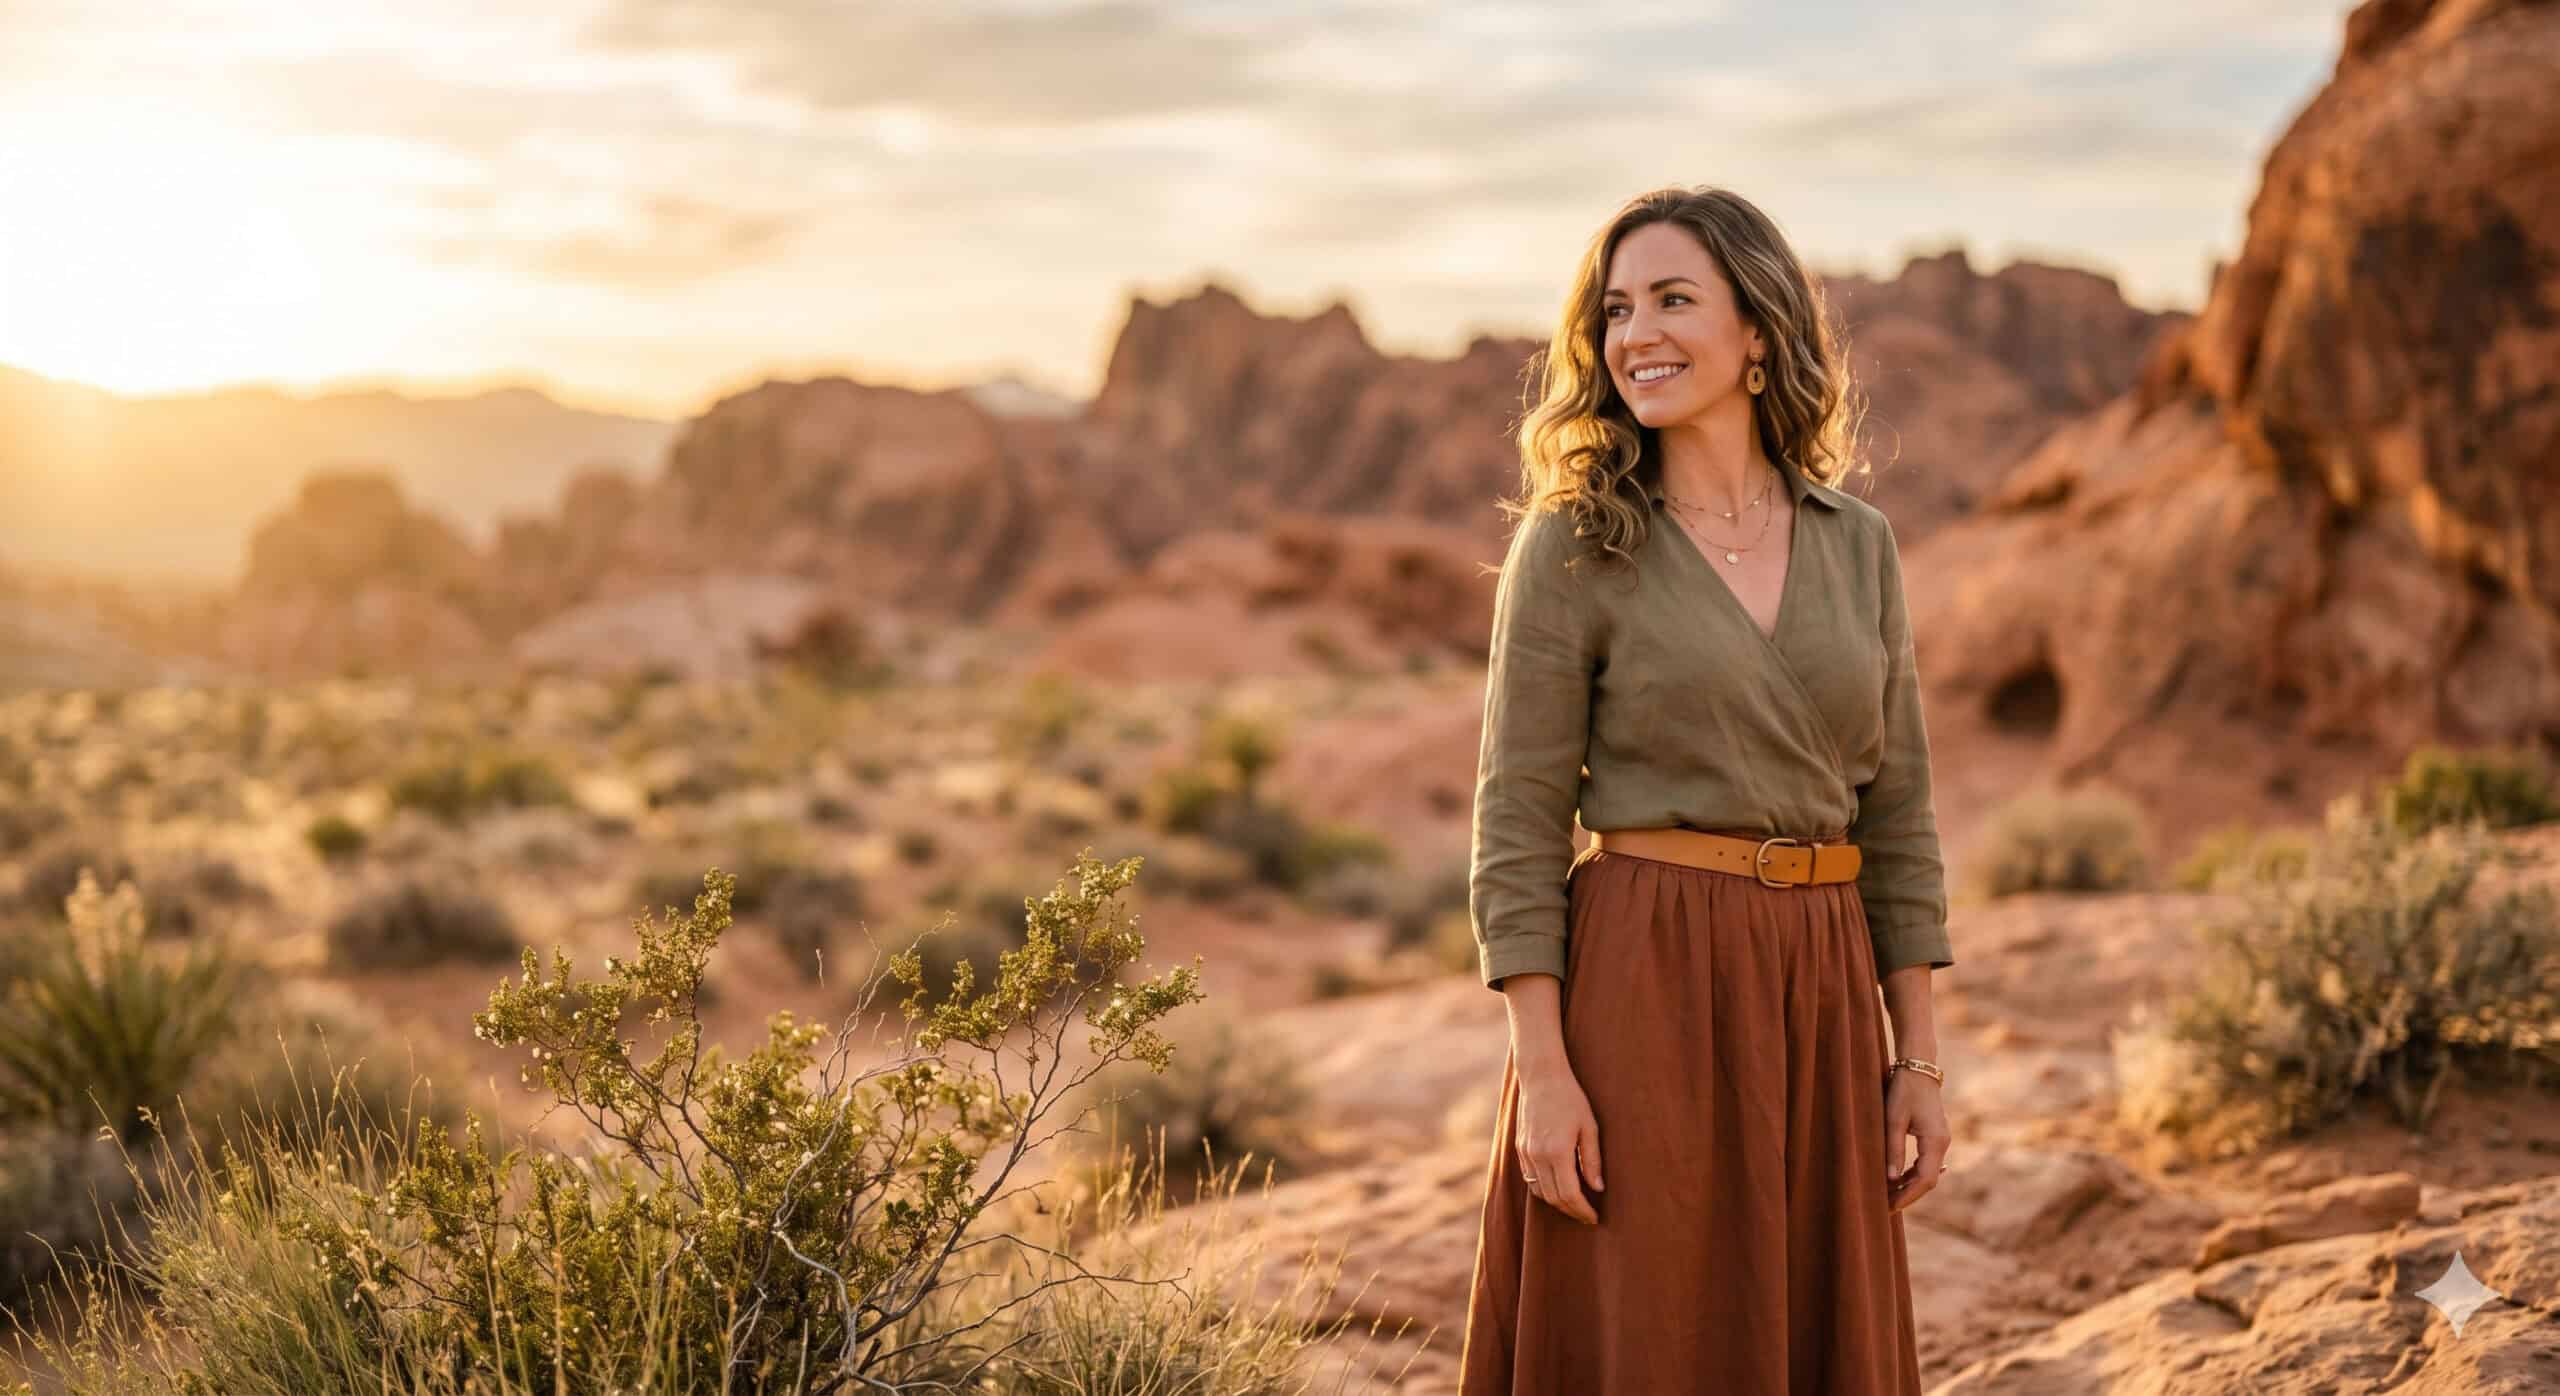
Match the goal, not the trend. Headshots want solid colors and clean lines — nothing that competes with your face. Family sessions work best in coordinated tones, not identical outfits. Brand and lifestyle sessions benefit from variety: one polished look, one casual look, one that feels most like you.
What photographs well: jewel tones, earth tones, soft neutrals, denim, structured knits, anything with clean lines. What to think twice about: tight patterns like herringbone or fine stripes can create a moiré effect on camera — a visual interference pattern that’s nearly impossible to fix in editing. Loud neons and large logos pull attention away from your face. Neither is flattering.
Fit over fashion. Clothes that don’t fit right create tension — in your body and in the frame. If you’re tugging, adjusting, or holding your breath, it shows. The most flattering outfit is the one you feel genuinely comfortable moving in.
The day-before test: try everything on. Sit down. Raise your arms. Walk across the room. Do a slow turn. If anything pulls, gaps, rides up, or feels fussy, swap it. You’ll be moving throughout the entire session — whatever feels awkward at home will feel worse in front of a camera. Bring 2–4 complete looks if your session length allows. More variety means more final images you’ll actually use.
Hair, Makeup, and Skin: The Camera-Ready Basics
You don’t need a professional glam team to look great in photos. But a few specifics make a real difference.
Professional hair and makeup is worth considering for headshots, brand sessions, and boudoir — anything where you want to feel polished and a step above everyday. If you go that route: share inspiration photos in advance, ask specifically for makeup that photographs well (defined features, camera-friendly coverage), and consider a trial if it’s a high-stakes session.
DIY prep: don’t try new products right before your shoot — stick to what you already know works on your skin. Go slightly more defined than your everyday look, since cameras soften contrast and makeup can read lighter than it appears in the mirror. Bring blotting sheets or powder, a lip color for touch-ups, and a small comb or brush for on-location fixes.
Easy-to-miss details that show up on camera: clean nails (neutral polish is always safe), moisturized hands (they appear in more shots than most people expect), and steamed or ironed clothing — wrinkles are sharper in photos than they look in person. Check for lint, remove any tag stickers from new clothing, and bring clear deodorant if you’re wearing light colors.
For skin prep, think consistency over intensity. The two weeks before your session aren’t the time to try a new routine or aggressive treatment. Stay consistent, hydrate, sleep. Skip heavy peels or exfoliation within five days of the shoot. The American Academy of Dermatology has straightforward guidance on maintaining a healthy baseline without overcomplicating things. Good lighting is forgiving — stress is harder to edit out than a blemish.
Practice Posing — Just Enough to Feel Ready
You don’t need a memorized posing routine. What you need is just enough practice that you don’t freeze when someone says “okay, do whatever feels natural” — which, for most people, is the opposite of natural.
Try this for five minutes the day before: stand in front of a mirror with your body turned about 45 degrees — not squared straight on to your reflection. Drop your shoulders, deliberately. Find the smile that arrives when you’re mid-laugh, not the one you hold on command. Experiment with soft hand placement: one hand in a pocket, resting on a hip, lightly touching your hair, holding a jacket lapel.
The thing that changes portrait photos most: micro-movement. Small weight shifts, a slight head tilt, walking slowly toward the camera — these create naturalness that static poses can’t manufacture. Your photographer will guide you through this during the session. Knowing it exists means you’ll lean into the direction instead of resisting it. A good photographer makes this easy. Your only job is to show up open to guidance.
Pack Smart and Arrive Early
A photoshoot bag takes 10 minutes to pack. Skip it and you’ll spend 20 minutes improvising on location.
Essentials to bring:
- Water and a light, non-messy snack
- Blotting sheets or powder for touch-ups
- Lip color
- Small comb or brush
- Lint roller — this one earns its weight every single session
- Fashion tape or safety pins
- Deodorant (clear if you’re wearing light colors)
- Phone with inspiration images pulled up
If you’re changing outfits, bring every accessory for every look — shoes, belt, jewelry, all of it — in a tote or garment bag. Missing one shoe is a real thing that happens. Plan to arrive 10–15 minutes early. Not to do more prep, but to breathe. The sessions where clients look most relaxed are almost always the ones that started calmly, not the ones that started in a sprint from the parking lot.
If you’re still deciding on a location, our guide to the top Las Vegas photoshoot locations covers desert backdrops, downtown murals, architectural spots, and timing notes for each — whether you want golden-hour desert or the energy of the Strip at dusk.
The Night Before and Day-Of Game Plan
Night before:
- Lay out every outfit, shoe, and accessory
- Steam or iron clothing — don’t leave this for the morning
- Look up the exact address, confirm parking, and give yourself a buffer
- Charge your phone
- Sleep — it’s the most underrated item on this entire list
Morning of:
- Eat something light before you arrive — hunger shows in posture and patience
- Glance through your inspiration images one more time
- Take a few slow breaths in the car before you walk in
If nerves show up — good. Almost everyone feels them, and they usually disappear three minutes into a session once things start moving. You’ve done the preparation. The rest takes care of itself.
Frequently Asked Questions About How to Prepare for a Photoshoot
How far in advance should I start preparing for a photoshoot?
Start 2–3 weeks out. That gives you enough time to select outfits, do a trial run on hair and makeup if needed, and avoid any last-minute skin treatments that could cause irritation. Day-before and day-of prep goes quickly once the bigger decisions are already made.
What should I avoid wearing to a photoshoot?
Tight patterns — herringbone, fine stripes, tiny checks — can create a moiré effect on camera, a visual interference pattern that’s nearly impossible to fix in editing. Super-bright neons and large graphic logos tend to pull attention away from your face. Beyond patterns, avoid anything that fits uncomfortably. Fidgeting reads on camera as tension, and tension reads as stiffness.
Do I need professional hair and makeup for my session?
Not always — it depends on the session type and how you want to feel. Headshots, boudoir sessions, and brand shoots tend to benefit most from professional glam, and the investment usually shows in the final images. For lifestyle and family sessions, most clients do great with their own routine. If you’re genuinely unsure, a trial appointment before the actual shoot helps you decide.
What if I feel awkward or nervous on camera?
Most people do, at first. The real fix isn’t more practice at home — it’s a photographer who gives clear direction and makes you feel comfortable. Ask about their approach to nerves during your consultation. How they answer that question tells you a lot about what the actual session will feel like. A photographer who has a real answer has thought about it, which usually means they’ve solved for it.
Should I bring props to my photoshoot?
For headshots, skip them — keep the focus on you. For lifestyle, branding, or creative portrait sessions, meaningful personal items can add genuine context: a leather jacket, a musical instrument, a book you actually read. Talk to your photographer beforehand so you’re not hauling things that won’t make the final cut.
Preparing for a photoshoot really comes down to a few clear moves: know the goal, pick outfits you can actually move in, handle the basics of skin and hair, and show up a little early. The posing, the energy, the images that stop you mid-scroll — that part happens once you relax into the session and let the prep do its job.
Recent Posts
Boudoir Photoshoot Prep Guide: Outfits, Poses, and What to Expect
Your first boudoir photoshoot sounds terrifying on paper. Most people expect to feel awkward, stiff, and unsure of what to do with their hands — and most people walk out shocked by how wrong that...
Las Vegas Photographer Prices (2026): What Every Type of Shoot Really Costs
Las Vegas photographer prices can run anywhere from a couple hundred dollars to several thousand — sometimes for what looks like the same type of shoot. That's not an accident. This city has an...